I saw this idea from Becca at Blue Cricket Design. I thought that it was so cute. I thought I would put my personal touch on it and add decorative paper to each washer, I love color.
.JPG)

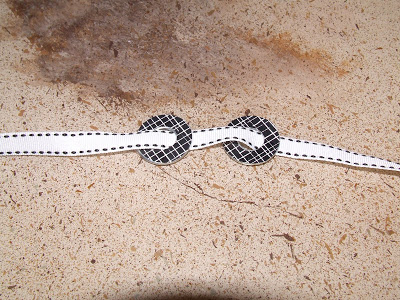
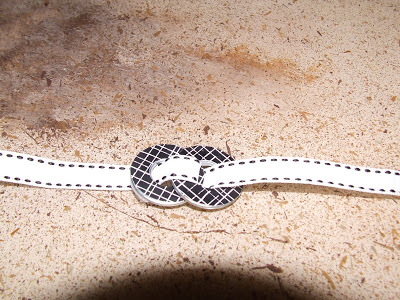
6)Next, take the long ribbon and go back through the top of the first washer. The second washer will now be on top of the first washer
 7) Take the long ribbon and put it through the bottom of the second washer (metal side) and pull tight


 **Although this is a super cute necklace, it’s not the lightest thing, so three hours of church was about my max. It was worth it though, I had at least 10 comments on it 🙂 One of my favorite things about these necklaces is the fact that you can have it be nice and long, or make it short. I wore it short with this shirt but would wear it long with a higher collared shirt.

.JPG&description=Keeping%20it%20Simple%3A%20Multiple%20washer%20necklace%20tutorial "Pin It")
It's beautiful!
what a neat idea!
I love color too, it is darling.
I love how you added paper to your washers – what a great idea!
That is SO cute… love it! 🙂
Your tutorial is a lot better than the last one I looked at. I think I can do it now. Thanks for the great details.
That is amazing! I have to try…What a great idea. I am new to your blog and am excited to look around:)
My teenager is going to love this!
Sooooo cute! Love love it.
Destri
So cool! I love it! : )
Very cute! I linked to this in my Friday Favorites! ~Lanie
http://laniejandco.blogspot.com/2010/02/friday-favorites-21910.html
O.K. this is way to cute. Men what can you do with them???LOL They just don't get it..
I love it… I'm bookmarking this, so I can do it one day…
Thanks for joining Get Your Craft on Thurs. at Life As Lori
Please join me next week for another great party!
So pretty!
Very cute! I love this version with the paper!
I was wondering if it was heavy as soon as I saw what it was made out of! It's very striking.
How creative!
I hope you'll drop by AtticMag this week to tour my home.
Allison
I love that you decorated the washers instead of leaving them plain. It really makes a statement now. Thanks for sharing with Made it Monday! Jules
Very cute!!
Thank you so much for linking up with the Talented Tuesday link party at My Frugal Family, which is hosted every Tuesday. Please feel free to stop back in every week and post your newest projects!
I was going to say that it looked heavy, then I read on that it was. It is really cute and I love the addition of the paper. I also love your hair cut.
Fun idea! Thanks for linking last week!
Andrea @ TheTrainToCrazy.com
Love the fun designs and sizes!
-Tiff
That's the exact same technique used in making pop tab bracelets! So cool to see it used with washers…
Absolutely adorable..cool idea
I found it!!!! I love it!
Wow this so great too. You are so creative. I just Love your Blog!!!
Your tutorial is an awesome inspiration! Many thanks for sharing. I would like to feature your designs at http://www.handmade-jewelry-club.com/
Contact me here if you have a concern.
Jane
http://diylessons.org/