Do you ever have a great idea that you so excited about doing. It looks so cute in your head, it even looks great on paper but when you sit down to do it, it doesn’t work out and just doesn’t look like you thought it would. Well that happened to me with this project. I was so excited about doing it, I even thought I would make one for someone else. When I sat down to do it, things just weren’t working out and I had to rethink the whole thing. Luckily, it turned out pretty good and it all wasn’t a complete waste of time.
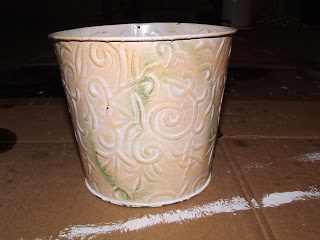
First I started with this pail that I got from the dollar store. I didn’t really care for it, so I spray painted it brown.
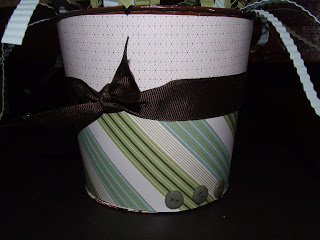
Next I covered the pail with cute paper. This was my first problem I encountered. Who knew that putting paper on a pail wouldn’t be super easy. The curvature of the pail made it difficult. So I had to lay the paper on flat, trace the bottom of the paper where it hit the bottom of the pail and cut it. Luckily the ribbon covers up a lot because the lines weren’t super straight.
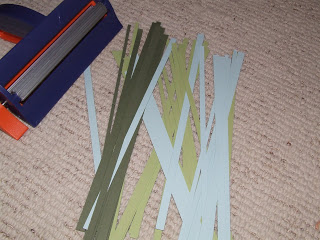
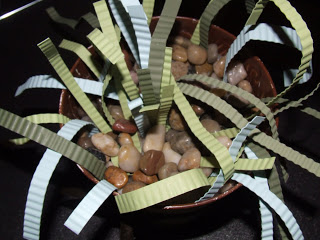
Next I wanted to make some “grass” or really a filler for the pail, so I cut several little strips out of paper. The width varied for each strip, it was pretty random.
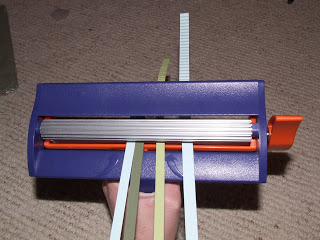
Next I put them all through the crimper to give a little more texture.
Next came the metal loops. I was thinking was would be able to get some thick wire to bend into a cute spiral shape, but that didn’t work. I was super excited when I found these poles at Home Depot, it is a sign holder (for garage sale signs). One problem though, I need to bend them into spirals. I soon learned that it is not easy to bend steel, it’s a pretty tough material. Luckily I have an awesome husband that is strong enough to bend them and cut them to sizes that I needed.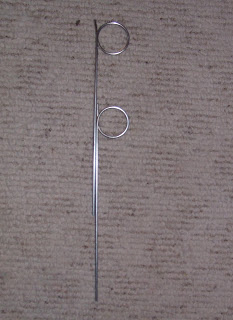
I filled the pail with floral Styrofoam (to hold the metal rods) and rocks for adding decoration. I then placed the grass in various spots and at various lengths to add color.
Finally, I place bent rods into the Styrofoam.
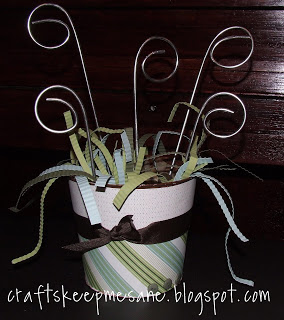
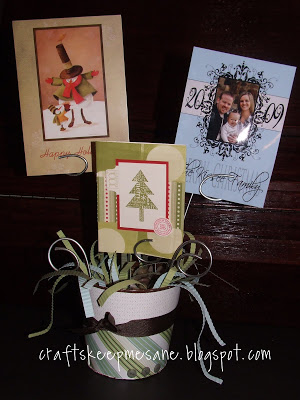
Just like that, you have a very cute photo or card holder. I plan on having it as a card holder during the holiday season and a picture holder the rest of the year.
Eventhough I had a couple of problems, I love the outcome. When I was actually making it, it really didn’t take very long, what took long was figuring out how to do it. Now that I finally have it all figured out, maybe I will make one for someone else 🙂


So cute, Kaysi! You are so super creative! I want to try one of these! Keep the great ideas coming! You're filling up my birthday/Christmas/Anniversary list for all next year!!!! Loveyaloveyourcrafts!
I'm having fun with all this craft stuff! Made the clip/picture frames and the post it note holder. I like em! fun stuff! thanks Kaysi. Your enthusiasm has rolled over onto me!
Thanks! I'm so glad that the two of you are doing these crafts. Aren't they fun and super easy to do?? I love it!
Very cute idea!
-Crystal
I love your ideas. You are very creative. After I get all my blog problems fixed I would love to have you do a tutorial some time-what do you think. I am following.
Cheri
LOVE this!!
Just discovered your blog, looking forward to taking a peek through your archives first chance I get!
Super cute! So many of my projects are like yours….seem easy when you see them in your head, but the actual execution leaves a bit to be desired 🙂 I always say true creativity is improvising our art as we go, and not giving up.
I love your blog! You have tons of really cute ideas! Thanks so much for linking up to 'Tis The Season Thursday!
In Love with this projects, it looks so pretty!!!
Merry Christmas!
Erika
I love it! It came out great and could be used all year the colors and patterns don't look too Christmas-y.
I love your crinkle machine. I have never seen one–where did you get it.
Cheri
Hey, I totally just noticed my Christmas card in this darling photo holder! Haha! Cute 🙂
Cheri- you can get them at any craft store. I know that Joann's has a 8×11 one
Kaysi