• Skip to primary navigation
  • Skip to main content

Keeping it Simple

creating simple crafts, DIY, recipes and more

  • About Me
  • Advertise
  • Buttons
  • Contact Me
  • Keeping it Simple Designs
  • Privacy Policy
  • Tutorials
  • Home Decor & DIY
  • Recipes
  • Holiday Crafts
  • Gaming & Geek Crafts
  • Printables
  • Kids Crafts
  • Sewing
  • Vinyl Crafts

Halloween and Fall Candy Pouches Tutorial

September 4, 2013 by Kaysi 34 Comments

A couple days ago I posted about some yummy and fun fall treats, and in that post I made these fun candy pouches.  I had some people ask if I could expand the tutorial on how I made them, so I decided to make a full tutorial on how I made them!  These can be perfect for parties for favors or just to make and give to your kids.  They are super easy to make too!

fall candy pouches
This is how I made them:
Using my Silhouette,  I cut out 2 shapes that were the exact same size out of card stock.
fall candy pouches (1)
Then with scissors, I cut out a hole in the middle of the shape.
fall candy pouches (2)
Using my glue gun, I glued the full ghost onto the back of the sandwich bag.  I just glue the edges.
fall candy pouches (3)
Then I put the M&Ms into the bag.  I used the candy corn kind, they have the yummy white.
fall candy pouches (4)
I added some brown ones for eyes and a mouth and then placed the ghost with a hole in the middle on top of the sandwich bag.  Then I glued all the around the edge, making sure the M&Ms don’t fall out.  The hot glue will melt the bag into the card stock, so the two pieces of card stock will stick together.
fall candy pouches (5)
Here is what they look like all glued together.  I then trimmed the bag off.
fall candy pouches (6)
And that’s it!  Super easy and cute!  And of course yummy!
fall candy pouches (9)
I have been using these as decorations too.  And when the season is over, I can enjoy a yummy treat :)!
fall candy pouches (8)
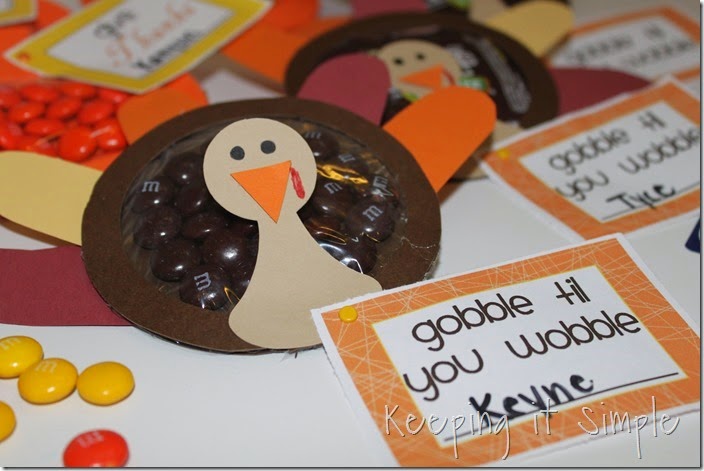
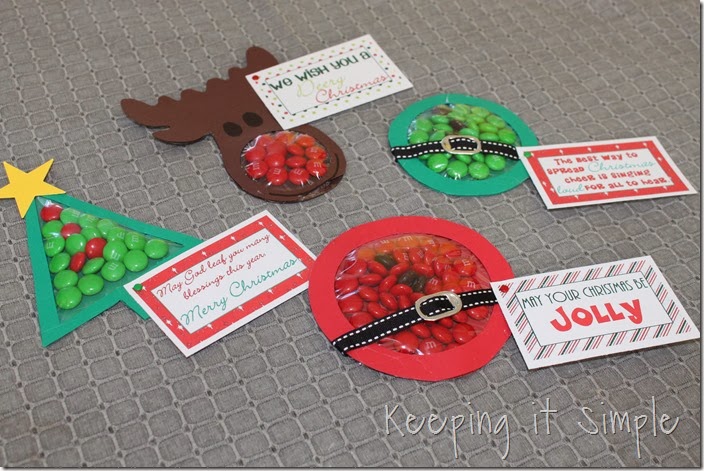
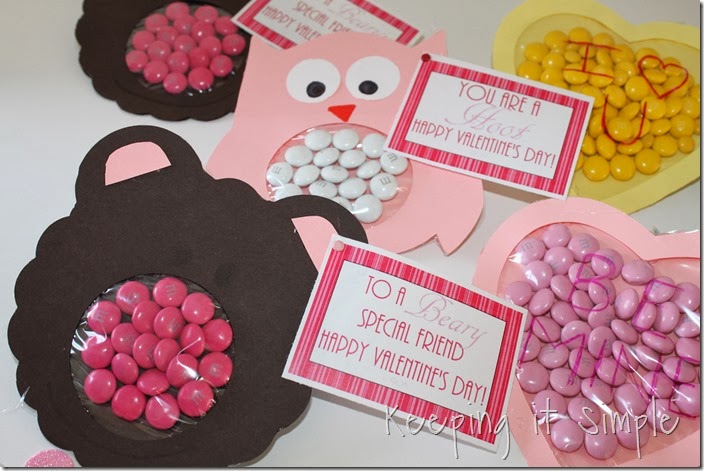
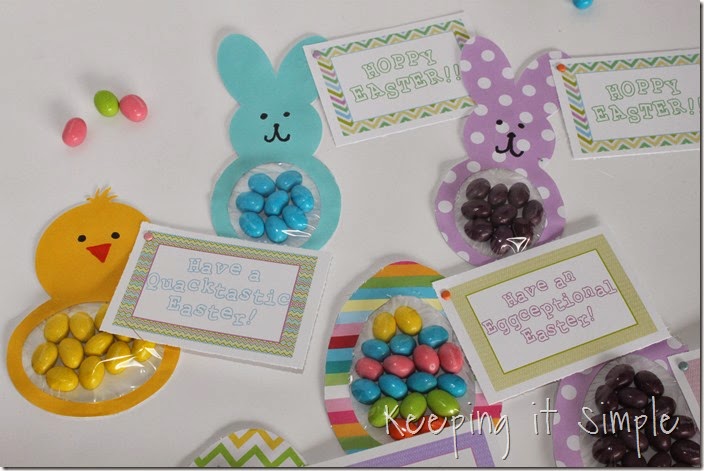
Here are 4 more that I have done for the different holidays.  I just love them!
* Thanksgiving * Christmas * Valentine’s Day * Easter * 4th of July *

Easy Thanksgiving Candy Pouches (17)Christmas M&M pouches #freeprintable (9)Valentine's-Day-M&M-Candy-Pouches #freeprintable (8)Easy-Easter-Treats-Candy-Pouches (9)4th-of-July-Flag-Candy-Pouches (12)

Here is a video on how I make these, enjoy 🙂

HALLOWEEN ideas:

Farmhouse Signs

Witch Parking Sign
Halloween-decor-Witch-brown-and-witch-parking-sign (7)

Halloween Candy Bars
#ad Halloween-candy-bar-wrappers-with-Halloween-jokes-printable #BooItForward (7)

Pumpkin Snack Bag
Halloween school snack idea (5)

Halloween Soaps
Halloween-soaps #DTAnniversary (16)

Halloween Board Game
#shop Halloween Board Game (16)


Bowling Cans Game

Halloween bowling cans (1)

2×4 Halloween Characters 

Candy Corn Wreath


Filed Under: autumn, Halloween, kids, paper, silhouette, tutorial, Uncategorized

Previous Post: « Lace bubble skirt
Next Post: Baby Boy Outfit »

Reader Interactions

Comments

  1. Amy Gehring

    September 4, 2013 at 5:13 pm

    Very cute! Thanks for posting the tutorial. I love simple crafts – and the kids can almost make these too – with a little guidance with the hot glue gun!

    Log in to Reply
  2. brooknwlrt

    September 4, 2013 at 6:16 pm

    so cute!!! great tutorial me and the little one will for sure be doing this for halloween treats for his class! thanks Kaysi =)

    Log in to Reply
  3. marissa | Rae Gun Ramblings

    September 5, 2013 at 3:07 am

    This is SO darling! Love love love it.

    Log in to Reply
  4. Katie @ Made to be a Momma.

    September 5, 2013 at 1:10 pm

    Very Cute! Pinned!

    Log in to Reply
  5. UtahCouponDeals

    September 5, 2013 at 4:27 pm

    Great idea! Thanks 🙂

    Log in to Reply
  6. Britney Mills

    September 5, 2013 at 7:54 pm

    Yay for hot glue! For those times when you just don't want to thread your sewing machine 🙂 Thanks for sharing!

    Britney @ The Princess & Her Cowboys

    Log in to Reply
  7. Leanne

    September 6, 2013 at 2:56 pm

    These are darling ! Pinning!

    Log in to Reply
  8. Angela Bain

    September 6, 2013 at 3:25 pm

    This is such a neat idea! Thanks for sharing.

    Log in to Reply
  9. Our Pinteresting Family

    September 7, 2013 at 12:05 pm

    Love this idea!

    Log in to Reply
  10. JDaniel4's Mom

    September 8, 2013 at 4:30 pm

    This is such a cute idea! It would be great for my son's class party at school.

    Log in to Reply
  11. Diana - FreeStyleMama

    September 9, 2013 at 1:05 am

    Super cute! PINNED!

    Log in to Reply
  12. Susan @ Oh My! Creative

    September 10, 2013 at 10:43 am

    Good morning! This is so cute…I love it! Stopping by to tell you I featured your candy pouches from the Whimsy Wednesday Link Party! You can find the feature here –> http://bit.ly/1ay7ceN

    Log in to Reply
  13. Jessica Anderson

    September 10, 2013 at 9:22 pm

    These are so stinkin' cute! What a great idea!

    Log in to Reply
  14. Life With The Crust Cut Off

    September 11, 2013 at 6:29 pm

    This looks amazing!! I love it!! I would love to invite you to link it up at our new party Lovely Ladies Linky where you link up once and get seen on 6 blogs!! Link up starts Wednesdays! http://www.lifewiththecrustcutoff.com/lovely-ladies-link-up-link-up-1/
    Hope to see you there 🙂
    Parrish @ Life With The Crust Cut Off

    Log in to Reply
  15. Kim~madeinaday

    September 11, 2013 at 7:07 pm

    Stopping by to let you know I am featuring you tomorrow on Made in a Day! Thanks so much for linking up!
    Kim

    Log in to Reply
  16. Noreen

    September 12, 2013 at 11:59 pm

    Clever idea – and fun for school parties, too.

    Noreen
    Crafty Journal

    Log in to Reply
  17. Amila Wickramarachchi

    September 13, 2013 at 11:52 pm

    really cute idea…going to pin it

    Log in to Reply
  18. Dana

    September 25, 2013 at 8:16 pm

    I love this idea!! Can you tell me which Cricut Cartridge you used?

    Log in to Reply
  19. Laura - Eye Candy Creative Studio

    September 9, 2014 at 2:46 am

    I have done these before (the 'idea') & I love how much fun they are. These look great & such a fun craft to do!

    Log in to Reply
  20. Stephanie Paxman

    September 9, 2014 at 4:35 am

    Everyone would love these!!

    Log in to Reply
  21. Mabey She Made It

    September 9, 2014 at 5:48 am

    So cute!

    Log in to Reply
  22. inkhappi

    September 11, 2014 at 10:41 pm

    These are so fun! 🙂

    Log in to Reply
  23. Tracey Hilborn

    September 12, 2014 at 5:40 pm

    Too cute!

    Log in to Reply
  24. Albion

    September 13, 2014 at 2:57 pm

    I love these so much!!

    Log in to Reply
  25. MrsMajor Hoff

    September 15, 2014 at 4:13 am

    So cute!

    Log in to Reply
  26. Andrea Nunez

    September 20, 2014 at 4:29 pm

    This is an awesome idea!!! How did you the templates of each object?? I really want to make some! Thank you so much

    Log in to Reply
    • Kaysi

      September 20, 2014 at 7:02 pm

      They are cut out with a cutting machine but you could draw the shape and cut them out with scissors

      Log in to Reply
  27. ღMarziaღ

    October 9, 2014 at 10:06 am

    wow fantastic!!

    Log in to Reply
  28. kyle_keith

    October 9, 2014 at 11:46 am

    they just so cute n hilarious 🙂 n how to eat it..which part should be tear?

    Log in to Reply

Leave a Reply Cancel reply

You must be logged in to post a comment.

This site uses Akismet to reduce spam. Learn how your comment data is processed.

Copyright © 2026 · Foodie Pro & The Genesis Framework