• Skip to primary navigation
  • Skip to main content
  • Skip to primary sidebar

Keeping it Simple

creating simple crafts, DIY, recipes and more

  • About Me
  • Advertise
  • Buttons
  • Contact Me
  • Privacy Policy
  • Tutorials
  • Home Decor & DIY
  • Recipes
  • Holiday Crafts
  • Gaming & Geek Crafts
  • Printables
  • Kids Crafts
  • Sewing
  • Vinyl Crafts

DIY Dining Table with Burned Wood Finish using a BernzOmatic Blow Torch

February 24, 2015 by Kaysi 27 Comments

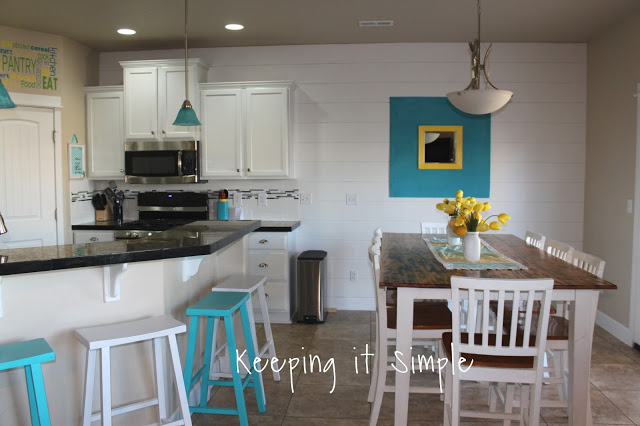
Three years ago we bought the perfect dining table for our family.  I loved everything about it and it worked perfectly for us for three years, then we moved into our new house.  It worked but it made our dining room really cramped, so it just wasn’t working.  I have been wanting to do make a new dining table for a while now but finally got around to it.  I absolutely love how it turned it out and it was easier than I thought it would be.  I decided that I wanted the table to have some character, so instead of staining it I lightly burned the surface of the wood using a BernzOmatic blow torch to give it a burned wood finish and I love how it turned out!

DIY-Dining-Table-With-Burned-Wood-Finish #BernzOmatic

Here is our old dining table.  We had the 8 chairs around it but eventually had to take out the leaf and it only fit 6 chairs.  Not great when you have a family of 7 and you can only fit 6 people around the  dining table.  So we used the base and chairs and then we made the table top.
House pictures 8-30-14 (28)
We headed to Home Depot and picked out some wood.  I went with pine wood that was 1in x 8in x 8ft.  We bought 6 boards and then cut the pieces to 7 feet long.
DIY-Dining-Table-With-Burned-Wood-Finish #Bernzomatic (1)
To put them together we used a pocket screw (no glue was used).  We first drilled all the pocket screws holes into the wood before screwing the pieces together.  We made several holes in each piece of wood.  The ends had 2-3 holes and then we did it every 12 inches or so.
DIY-Dining-Table-With-Burned-Wood-Finish #Bernzomatic (3)
Once the holes were drilled, then we screwed the pieces together.
DIY-Dining-Table-With-Burned-Wood-Finish #Bernzomatic (5)
As we were screwing them together, we screwed two pieces together and then put all 6 pieces together.
DIY-Dining-Table-With-Burned-Wood-Finish #Bernzomatic (6)
For the ends we wanted to make sure that the seam was very flat and secure, so we used clamps and a board underneath when we screwed it together.  Sometimes it took some force to get the boards to lay flat.
DIY-Dining-Table-With-Burned-Wood-Finish #Bernzomatic (8)
For more support and to help with the flatness of the seams, we screwed some wood onto the
boards.  The screws were put in around the seams to help make them look better and flatter. DIY-Dining-Table-With-Burned-Wood-Finish #Bernzomatic (13)
Once we had all of the board screwed together, we used a router and rounded the edges.  Make sure you practice on a scrap piece of wood before to find the right setting.  We used the router on both the top and bottom of the table.
DIY-Dining-Table-With-Burned-Wood-Finish #Bernzomatic (15)
Here is the rounded edges from the router.  So pretty huh?  I love the rounded edges, gives it a nice finished look!
DIY-Dining-Table-With-Burned-Wood-Finish #Bernzomatic (18)

Now for the fun part!  We got to burn the surface of the wood.  I loved how this turned out.  We just took the TS8000 BernzOMatic and burned the wood, going back and forth over the wood.  We were about 2-3 inches away form the wood.  Make sure to go with the grain because you can see lines if you don’t.  The longer you hold it on a spot, the darker the wood so you have to make sure you do it evenly and lightly.  The blow torch is awesome!  You can change the settings on it so you can have a big flame or a smaller flame.  The higher the flame the darker the color of the wood will be.  The blow torch was so nice and easy to use, I am definitely going to be using it for more projects in the future.

DIY-Dining-Table-With-Burned-Wood-Finish #Bernzomatic (22)
Here is the dining table all burned.  Doesn’t it look so cool??  I seriously love the color and the character the burning gives it!
DIY-Dining-Table-With-Burned-Wood-Finish #Bernzomatic (29)
Now for the base.  We used our existing dining table base.  We added two new pieces of wood to make it longer on the sides.  We had to drill holes into the wood so we could screw it into the table top.  The key is not to let the screw go through the top.
DIY-Dining-Table-With-Burned-Wood-Finish #Bernzomatic (31)
Here is what the base looks like all put together.  We also put on one more strip of wood in the middle to give it more support and make it more sturdy.
DIY-Dining-Table-With-Burned-Wood-Finish #Bernzomatic (36)
Next we put on a pre-stain onto the table top.  You need this for pine wood, it seals the wood and protects it.
DIY-Dining-Table-With-Burned-Wood-Finish #Bernzomatic (38)
 We let the pre-stain dry for 15 minutes and then after two hours we put on the top coat. We used a clear polyurethane finish for the top coat.  We used the satin finish to give it a little shine but not too much.  We put on three coats.  In between coats you have to sand the wood and then put it on.
DIY-Dining-Table-With-Burned-Wood-Finish #Bernzomatic (39)
Once the polyurethane dried we put the table top onto the legs and admired it’s beauty!  I love how it looks in my dining room!
DIY-Dining-Table-With-Burned-Wood-Finish #Bernzomatic (42)
I made a table runner and a few decorations to go on it.
DIY-Dining-Table-With-Burned-Wood-Finish #Bernzomatic (45)
DIY-Dining-Table-With-Burned-Wood-Finish #Bernzomatic (47)
DIY-Dining-Table-With-Burned-Wood-Finish #Bernzomatic (49)
And that’s it!!  It was actually really easy to make.  It took some time but nothing was really hard to do.  And it turned out so well.  It is so nice to be able to have all of our family sit at the table for dinner again!  Plus it just fits so much better in the space we had.

DIY-Dining-Table-With-Burned-Wood-Finish #Bernzomatic (51)

Check out these DIY ideas:


DIY Fire Pit

DIY Fire Pit Sofa Bench

Master Bathroom Makeover
Shiplap Wall

Storage Shelves
DIY-Shelves-For-A-Small-Bathroom (13)


Family Photos Gallery
DIY Gallery Wall With Old Family Pictures (27)
Garage Mudroom Lockers

Easy Bathroom Shelf
#ad DIY-bathroom-shelf-for-razor-and-beard-trimmer #GiftofPhillips (29)


DIY Turquoise Pendant Lights
turquoise-pendant-light-how-to-dye-a-light-shade (15)


Filed Under: DIY, furniture, giveaway, home decor, home improvement, kitchen, mason jars, paint, sewing, spray paint, tutorial, Uncategorized, wood

Previous Post: « 16 Unique and Fun Decorating Ideas {MMM #266 Block Party}
Next Post: Super Easy Dry Erase Kids Chore Chart Printable »

Reader Interactions

Comments

  1. Crafty Mommy Diva

    February 24, 2015 at 5:35 pm

    Wow beautiful! Wish we had that talent; we need a new kitchen table!

    Log in to Reply
  2. Crafty Mommy Diva

    February 24, 2015 at 5:39 pm

    Sorry I kept clicking on the wrong ones to enter =)
    I tweeted, pinned, follow you on Twitter, visited FB and follow on Pinterest. You can delete my entries because I didn't read what we were supposed to comment about. Sorry!

    Log in to Reply
  3. carol clark

    February 24, 2015 at 7:35 pm

    https://www.pinterest.com/pin/229472543490004945/ i would love to make these coasters

    Log in to Reply
  4. Gallegos Newsletter

    February 24, 2015 at 8:02 pm

    https://www.pinterest.com/pin/28710516344970274/

    Would love to do this frame!

    Log in to Reply
  5. Heidi Robbins

    February 24, 2015 at 11:45 pm

    http://blog.ingredientsphoto.com/post/21326196084/food

    I'd love to distress a cutting board for product photography!

    Log in to Reply
  6. sandyhills x

    February 25, 2015 at 12:54 am

    I would love to use it for pottery – https://www.pinterest.com/pin/285697170088011305/ – shaunie

    Log in to Reply
  7. Albion

    February 25, 2015 at 1:47 am

    I would make your table!! I am so in love with it and it's perfect! https://www.keepingitsimplecrafts.com/2015/02/diy-dining-table-with-burned-wood.html

    Log in to Reply
  8. Samantha

    February 25, 2015 at 5:48 am

    I love the look that you achieved with your table, it really gives it more character. I fell in love with this type of technique while looking through Pinterest boards a while ago and couldn't help but pin a couple of ideas, I've also seen it called Shou Sugi Ban. I'd love to do a coffee table with this effect like this one http://www.instructables.com/id/IntroUsing-Shou-Sugi-Ban-to-make-an-interesting-co/ Thank you so much for your tutorial, you make it seem less intimidating that I initially thought it would be.
    Samantha – under ginger_rose

    Log in to Reply
  9. Stacie S-H

    February 25, 2015 at 6:34 am

    I dont know where my comment is but here it is again (btw your table looks AMAZING!) I would love to make this , https://www.youtube.com/watch?v=hlYqD7LOUtU and a blow torch makes the crayons melt nice and easy!

    Log in to Reply
  10. Kelly Tupick

    February 25, 2015 at 1:41 pm

    I have always wanted a unique rocking chair on my front porch. I would like to do something like this https://twitter.com/BarnsleyWksp/status/410443346776424448. I think my husband would love sitting out on the porch in something like this.

    Log in to Reply
  11. Ginger@gingersnapcrafts.com

    February 25, 2015 at 2:01 pm

    You are amazing! My hubby wanted to build our table. I told him no way! After seeing your tutorial maybe we will try it. 🙂 It turned out so pretty. 🙂

    Log in to Reply
    • Ginger@gingersnapcrafts.com

      February 25, 2015 at 2:03 pm

      Here's a cool project with a blow torch. 🙂 https://www.pinterest.com/pin/187814246933737194/

      Log in to Reply
  12. SolDucky

    February 25, 2015 at 4:06 pm

    This is really cool – aging new hardware – http://lovegrowswild.com/2013/06/how-to-instantly-age-new-hardware/

    Log in to Reply
  13. Kim Seghers

    February 27, 2015 at 6:06 am

    I love the way your kitchen table turned out. It looks beautiful. Maybe if I won my husband would make me a cool table like yours!
    Kim @ This Ole Mom

    Log in to Reply
  14. rondah s

    February 27, 2015 at 6:09 am

    I'd love to try this
    http://www.splitcoaststampers.com/resources/tutorials/heatedcopperaccents/

    Log in to Reply
  15. Robin

    February 27, 2015 at 9:15 pm

    GREAT table! Love this process! xo

    Log in to Reply
  16. Corinne Watson

    February 28, 2015 at 9:20 pm

    I've been trying to be more into home-improvement lately… this would definitely help. I am an artist, so i would love to make jewelry or art for my walls http://www.youtube.com/watch?v=hlYqD7LOUtU

    Log in to Reply
  17. pqcolletti

    February 28, 2015 at 10:28 pm

    I would use a blowtorch to make metal look like copper:

    http://www.ehow.com/how_8184206_use-metal-look-like-copper.html

    Log in to Reply
  18. Leela

    March 1, 2015 at 9:49 pm

    https://www.pinterest.com/pin/566116615630023938/

    Log in to Reply
  19. Michelle J.

    March 2, 2015 at 7:09 pm

    https://greenmangle.wordpress.com/2014/07/08/project-11-creating-texture-with-a-blow-torch/

    Log in to Reply
  20. Jessica

    March 3, 2015 at 1:21 am

    I would love to do some wall art like this! https://www.pinterest.com/pin/295478425524828399/

    jessicarwarfield at gmail dot com

    Log in to Reply
  21. Elizabeth P

    March 4, 2015 at 3:03 pm

    Your table looks great!

    Log in to Reply
  22. Elizabeth P

    March 4, 2015 at 3:03 pm

    Your table looks great!

    Log in to Reply
  23. Mae

    March 4, 2015 at 7:42 pm

    I would make a headboard like this one for my husband and I. Thanks. http://www.thisoldhouse.com/toh/photos/0,,20672101_21278317,00.html

    Log in to Reply
  24. Unknown

    October 25, 2015 at 8:49 pm

    I love this effect also. For wood-staining I use a coffee ground paste using any clear oil (vegetable oil works beautifully) for an incredibly warm, red-hued brown that really must be seen to appreciate it's depth and how it reacts to both natural and artificial light. The color you get is very similar to this but non-toxic and can be re-used again and again if gathered properly…1 cup of grounds goes far and I make the paste quite thick as oil goes far as well. Rub paste into the wood and allow it to sit overnight then best use a shop vac to get the bulk of it off as it is very messy, then just polish it with clean cloths…no varnish necessary. Make sure to work in an area where it won't matter if greasy coffee grounds pop about, or line the entire area with suitable drop cloths.

    Log in to Reply

Leave a Reply Cancel reply

You must be logged in to post a comment.

This site uses Akismet to reduce spam. Learn how your comment data is processed.

Primary Sidebar

 photo KISsidebaraboutme.jpg

Keeping It Simple Photobucket Keeping It Simple Keeping It Simple Keeping It Simple Keeping It Simple

Copyright © 2023 · Foodie Pro & The Genesis Framework