• Skip to primary navigation
  • Skip to main content
  • Skip to primary sidebar

Keeping it Simple

creating simple crafts, DIY, recipes and more

  • About Me
  • Advertise
  • Buttons
  • Contact Me
  • Privacy Policy
  • Tutorials
  • Home Decor & DIY
  • Recipes
  • Holiday Crafts
  • Gaming & Geek Crafts
  • Printables
  • Kids Crafts
  • Sewing
  • Vinyl Crafts

Christmas Family Tradition- DIY Personalized Christmas Dinner Plates

November 23, 2015 by Kaysi 8 Comments

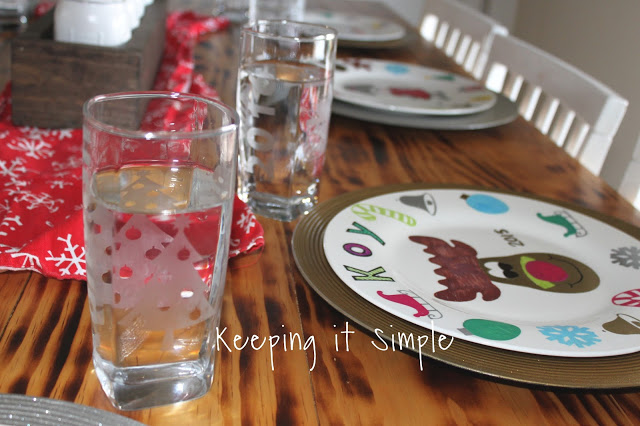
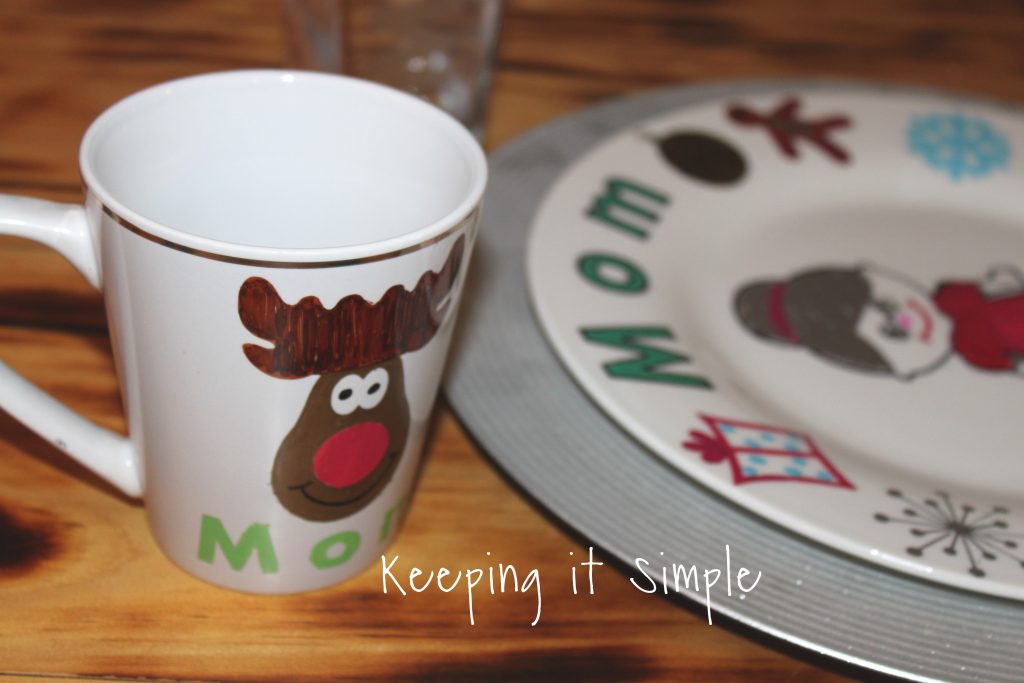
Last week I made some personalized Thanksgiving plates and it was such a big hit with my kids, we decided to make some fun Christmas ones.  It’s such a fun tradition and I can’t wait to use the fun plates.  For the Thanksgiving ones, we all did the same design.  But for the Christmas dinner plates, I went all out.  I had everyone have their own design and character.  Each character had a special thing on their plates that pertains to them, like Mrs. Claus had gingerbread cookies, Santa had stockings, the elf had a toy robot, the snowman and penguin had mittens and the gingerbread man had a ginger bread house.  The kids had so much fun making these and once again, they turned out SO GOOD!!  I love seeing all the different styles and colors that they used.  We plan on adding to these each year too.  Next year we are going to do a cup, the next year a dessert plate and so on.

****UPDATE****
We used the Christmas dinner plates and put the food directly onto the plate and then hand washed them.  They did fine but because I want these to last I plan on getting clear glass plates to put over these plates, so they are still fun and festive but they will last longer. This is how we made them.
I bought several white plates at the dollar store and then with my Silhouette I cut out several different shapes and designs out of vinyl.  Instead of taking off the excess of the vinyl, I took off the image, making a stencil.
DIY-Personalized-Christmas-Dinner-Plates (2)
Using transfer paper (the purpose of the transfer paper is to keep the image of the vinyl in tact so when you move it, it doesn’t mess up), I moved the vinyl onto the plate.  You can overlap the vinyl but make sure that the vinyl doesn’t go over the design (the place where you are going to color).
DIY-Personalized-Christmas-Dinner-Plates (3)
Here are three of the plates that we did.
DIY Christmas Dinner Plates (2)
The first thing I did with Mrs. Claus is made a black outline of her body (we did the same thing with Santa, snowman and the elf).  Then I drew in her features. Then I took off the vinyl.  ** The best way to do this is to work on one design at a time and then when you have colored in an image, take off the vinyl before you move to the next image.  If you wait for the paint to dry it will peel when you remove the vinyl.** I used oil based paint markers to color the plates. Click on the link to see what markers I used.
DIY-Personalized-Christmas-Dinner-Plates (5)
I finished coloring in all the of the shapes and removed all the vinyl with this cool tool.
DIY-Personalized-Christmas-Dinner-Plates (6)
I let the paint dry for a few minutes and then I drew on them a little more (like the tree and gingerbread cookies).  And that’s it for the plate, woohoo!
DIY-Personalized-Christmas-Dinner-Plates (7)
Here are my kids drawing on theirs.  I helped with the vinyl but then I sat back and let them create.  Sometimes that’s the hardest thing to do, just let them do their own thing.  They did a good job though, and they loved every minute of it!
DIY-Personalized-Christmas-Dinner-Plates (8)
Once they were all done, I baked the plates.  You put the plate in a cold oven and turn it on to 400 degrees.  Then you leave it in there for 20-25 minutes.  The longer it goes in, the higher chance the colors were get darker or change (like the red turns more dark red).  Also, use top rack only because on bottom rack really changes the color.
DIY Christmas Plate
And that’s it!!  Here are all of the different designs.  They turned out so good!
DIY-Personalized-Christmas-Dinner-Plates (15)
I love how the snowflakes look and the Christmas trees.  The silver and gold markers are my favorite too, they are metallic and they just look so good after baking.
DIY-Personalized-Christmas-Dinner-Plates (14)
I have to brag about my 9 year old’s plate.  He had the elf and I just cut outline of the elf, he did the rest completely himself, he drew the face, clothes and hair.  He’s a little artist!
DIY-Personalized-Christmas-Dinner-Plates (13)
I put the plates on a fun gold or silver charger and they are ready to go for Christmas!
DIY-Personalized-Christmas-Dinner-Plates (18)
DIY-Personalized-Christmas-Dinner-Plates (16)
DIY-Personalized-Christmas-Dinner-Plates (17)
DIY-Personalized-Christmas-Dinner-Plates (22)
These plates can be washed.  I would hand wash them (they can go into the dishwasher but the heat can change the colors of the paint). I have done these before and they have lasted (I did some last year on cups and they are still going strong).  There is chance of wear, so I wouldn’t recommend using them all the time but for a holiday dinner every year, I think they will last awhile!
DIY Christmas Dinner Plates (1)
****UPDATE: We added to our Christmas dishes, we made some fun etched glasses and Christmas mugs!  Go see the glasses here and the mugs here. ****


Check out these CHRISTMAS ideas:
2×4 Christmas Characters 
2×2 Place Settings
Christmas-2x2-Santa-and-Reindeet-Place-Settings (16)Teacher Gift
Pudding Snacks
#ad Christmas-fun-Snack-Pack-Pudding-Cups- with-school-jokes-printable #SnackPackMixIns (18)
Santa’s Cookies and Plate
#ad Santa-Cookies-Cake-Cookies-With-DIY-Santa-Plate #BakeintheFun (28)Christmas Soaps
Christmas Soap Neighbor Gift (10)Reindeer Gum
#ad Extra-gum-reindeer-gift #ExtraGumMoments (9)2×4 Snowman
2x4 snowman (8)

Personalized Stockings
#fabulouslyfestive DIY Applique Stockings (21)

Santa and Snowman Gum
#shop Teacher and Santa gift #GiveExtraGum (6)

Christmas Candy Pouches
Christmas M&M pouches #freeprintable (11)

Christmas Bowling Cans
Christmas bowling cans (9)

Snowman Soap
snowman soap (5)

Christmas PJS

Tree Pillow


2×4 Snowmen

This post contains affiliate links.


Filed Under: Christmas, kids, kids craft, kitchen, paint, silhouette, tutorial, Uncategorized, vinyl

Previous Post: « Last Minute Thanksgiving Crafts and Foods {MMM #305 Block Party}
Next Post: DIY Date Night Clutch »

Reader Interactions

Comments

  1. DIY On the Cheap

    November 24, 2015 at 12:44 am

    These plates are adorable!

    Log in to Reply
  2. KC Coake

    November 24, 2015 at 4:47 pm

    What a great tradition! I love the idea of adding to them every year. Then every year…more memories. Fun!

    Log in to Reply
  3. Melanie @ bear rabbit bear

    November 25, 2015 at 2:20 am

    These are so cute! This is a nice tradition.

    Log in to Reply
  4. Lindsay Gilbert

    November 29, 2015 at 8:37 pm

    Those plates are too cute!! Such a fun idea!

    Log in to Reply
  5. Amy Anderson

    November 30, 2015 at 2:03 am

    Those are darling! I want to make one with my niece!

    Log in to Reply

Leave a Reply Cancel reply

You must be logged in to post a comment.

This site uses Akismet to reduce spam. Learn how your comment data is processed.

Primary Sidebar

 photo KISsidebaraboutme.jpg

Keeping It Simple Photobucket Keeping It Simple Keeping It Simple Keeping It Simple Keeping It Simple

Copyright © 2023 · Foodie Pro & The Genesis Framework